Showing posts with label color swatch. Show all posts

Monday, February 3, 2014

Flower Shop Blues

Back in September, I went to St. George, Utah to Jill's lovely stamp camp/gathering and we made a darling card!  I think Jill said she got the idea from one of the hundreds of swaps from convention, so I don't know who the original designer was (message me if you know, so I can give the proper credit!) Anyway, I LOVE this card and have made it on several occasions.  I had blank one left over from another project so I added a sweet sentiment for my friend who lost her mother and added a few In-color dahlias for a bit more dimension.   I used the Flower Shop bundle and the Honeycomb embossing folder.
Make something beautiful for someone today!

Julie

Tuesday, January 21, 2014

Trying Something Different...

While I love to create, it is hard for me to spend as much time creating as I would like.  It is hard to balance all of the things I need to do with the things I want to do.  That is why I haven't posted as much lately.  I promise I will keep going and adding more creations, but it's hard to write whole blog posts about everything.  I will be sharing more creations and not as many words (I would much rather show what was created than write about it anyway). I'll throw a few personal things in every once in a while, but I think you would rather see my projects than "hear" me blab on and on.
Recently, I've seen some European demonstrators out there and they have beautiful photo templates with their creations, so I am CASEing some very talented ladies and trying something new.
Ta-da!  I'd really like to have your input, so feel free to let me know if you like this type of layout. I am just playing with these layouts, so I may change it up a bit depending on the project. Also, I'm not the best photographer, but I am trying new things, so be patient with me.
Products used:
Flower Shop Bundle
Chalk Talk Bundle
Soho Subway DSP
7/16" Natural Trim ribbon
Clear Stampin' Emboss powder

Make sure you check out my new "Current Promotions" button, it will take you straight to my Promotions page of my website. Come back Thursday for MDS Blog Hop--Yay!

Go create something!

Julie

Sunday, December 1, 2013

We Create Blog Hop--Get Well

  
I must say that I've dodged a bullet (or several) all year by not getting sick!  But many of my friends have not been so lucky (some more than once)!  Since some of you may be in the same boat, you might need a quick pick-me-up for your sickly friend!


I just got this Flower Shop bundle a few months ago and even though it's not particularly the season for fun little flowers I thought it would be just the right amount of "happy" for my sick friend!  Don't you love it when your packaging matches up with everything (no, I'm not OCD!!) It just makes me happy when I come across packaging to coordinate with my gift!  I added some Gorgeous Grunge to my card and Kleenex wrap along with the sentiment from Sassy Salutations.
Michelle is next in line, see how she shows love to all the sickies in her life!!  It's hard to believe this is the last We Create blog hop of 2013!  We hope to have even more exciting projects next year!  Join us, won't you? (and invite your friends!)

I hope everyone had a beautiful, blessed Thanksgiving! I know I did!  I had more people in my house than ever in 19 years--but it was fun!  Now, on to Christmas!!

Julie

Saturday, August 31, 2013

Blog Hop--Case that Pin

It's a new month which means a new blog hop!  This month we got to pick a pin from Pinterest and CASE it.  CASE stands for Copy And Share Everything.  The pin I chose was from Amy O'Neil.  In case you didn't know, I LOVE Gorgeous Grunge, so her card just called to me when I saw it.  And it didn't hurt that Amy is so freakin' talented! Seriously, the girl has mad skills!!! Thanks for the Pinspiration, Amy!! I used a different color palette than Amy did, but the layout of the card is basically the same.

I used my Regals designer buttons instead of the vintage clear buttons Amy used.  I love the way the buttons coordinate with the colors I used on the card even though they don't exactly match. I finished it off with a tag with "friend" from Fabulous Phrases stamped and embossed with silver embossing powder, the Chevron embossing folder, and some Baker's Twine.
Hippity hop over to visit the rest of the bloggers.  Show them some love by leaving a short comment--it's nice to know that people appreciate our work!

September is here, cooler weather is just around the corner! I'm thrilled!

Julie

Sunday, August 11, 2013

Never too early...

...to start thinking of Halloween, right?  I figure since the stores are already putting out their Halloween decorations, so can I!  This is one of the sets I received at convention called Tags 4 You and you can get it with a bundle that comes with the stamp set at the coordinating punch for only $26.95 for the clear mount stamps, that's a savings of 15% over buying them separately!
I hope you can see that I embossed the stamp using black embossing powder and added the Basic Rhinestone Jewels which I colored with a black Sharpie marker.  The background is all done with Gorgeous Grunge.  I punched a small circle of Glimmer paper and glued it behind the Vintage Faceted designer button.  
I took some White Baker's twine and colored it with the Old Olive marker then I lightly misted it with water so that the color saturated the twine--that is a fun way to get colors to coordinate with your project.  

Are you ready  for Halloween? It's just around the corner!

Julie


Wednesday, July 31, 2013

Blog hop--The Great Outdoors

Thankfully "The Great Outdoors" theme for this month is very broad, pretty much anything outside, because I'm really not a sporty or outdoorsy kind of girl!  I love to be outside, but preferably by a pool!  So while I was at Target the other day, I saw the cutest gift bags and I quickly took a picture so I would remember what they looked like! (Do you ever do that?)

I used my punches that I had created in MDS with the punch editor, and I came up with this card:

When I print this off I will leave off the button and add a real Designer button in Melon Mambo and maybe even some rhinestones or Dazzling Details glitter for some bling!  I'm thinking this card can be used for so many different occasions--I better print a handful of them!
Make sure you stop by the rest of the blog hoppers, too!  Share with your friends!

Today is also the first day of the Holiday Catalog, there are so many new seasonal stamps, papers, kits, gifts and more!  Check it all out!  

Julie

Monday, July 29, 2013

Sweet Smile

I've been a scrapbooker for more than 20 years, so switching to digital scrapbooking was a little out of my comfort zone, to say the least!  I loved using MDS for cards and home decor, but scrapping with it was another story!  It sounds pretty funny now, but my mind just has a problem translating on a spatial level I think.  I'm feeling a little more comfortable now that I have jumped in with both feet, but it's still a work in progress!!  Anyway, here's another Artisan contest entry. This one is of my daughter and my niece.  I am not a great photographer, I don't even have a really good camera, but I caught this darling smile on my two week old niece's face--I will call it a smile no matter what anyone else says!!

I used Twitterpated DSP and filled the punch I created in MDS, I think I called it "trapezoid".  I also created the flower punch, filled it with Baja Breeze and then used the crop tool to crop the shape of the flower in the Naturals Composition overlay stamp. I used the freeform line tool to make my stitched heart and finally, I cropped a small section of stitching, recolored it and enlarged it.  Background was also Naturals Composition overlay cropped into plank sizes. Check out my YouTube videos on cropping stamps and editing punches. Try our 30-day free trial for MDS or purchase MDS for only $19.95!   

I hope you are enjoying your summer!  Stay cool!

Julie

Saturday, July 27, 2013

I Like to be with You!

I have to say that I am so excited for the new 2013-2014 Artisan Design Team for Stampin' Up!  They are all very talented ladies and I can't wait to see all the projects they come up with this year!  While I was disappointed for about 5 minutes when I found out I wasn't chosen for the top 20, I quickly realized that it was better that I spend time with my kids before they both leave home this next year--I can't believe I'll be an "empty nester" by this time next year!  I will share some of the projects that I worked on for several months to submit them for the Artisan Design Team contest.  The first scrapbook page I did was "I Like to be with You". It is a photo of my daughter and her best friend. (they've known each other since they were babies!) I love this photo because this is how these girls are all the time--happy and silly!  I used a few overlay stamps (Decorative and Naturals Composition) recolored seam binding, and scallop border filled with Love Letter DSP.


Make sure you download the free 30-day trial of MDS!  It is so easy to use and I love the results I get! (I also love that I can delete, undo and change colors with the click of my mouse!)  Once you download the software, be sure to check out my YouTube videos for tips and techniques.  

Have a great weekend!

Julie

Thursday, July 25, 2013

My Convention 2013 Swaps

I have returned from another Stampin' Up! convention completely rejuvenated and exhausted!  Three days of adrenalin rush is not good for this old body, but somehow, I survived to tell the tale!  There were 5800 demonstrators from all over the US and Canada (along with a few from the South Pacific and Europe) and most of them brought cards to swap!  You can't believe the craziness that goes on when Stampin' Up! demonstrators get together to swap cards!  It's more like a swarm than a swap!  Cray. Zay.  I did two swaps this year, but I didn't make a bunch because I figure if I swap it I have to bring it home and store it somewhere--so I keep it to 40-50 cards.  I did a remake of my baby stacking toy card (don't you just love MDS!!!) printed four to a page and mounted them on coordinating colored card stock.  I had none left and I didn't take a pic before I left so I will show you the digital rendition:
I love how you can change a project in MDS to fit your needs, maybe next time I'll do it in pastels!
The second swap card was actually done for a organized swap, or a swap that has a theme and usually a set amount of people, in this case 10.  The theme was coordinating DSP and stamps which we have so many of!  I love that Stampin' Up! has "suites" of paper, stamps, and embellishments that coordinate with each other so you don't have to think, "Does this go together?" All you have to do is let your creativity run! (unless you're like me and you hit "the DEAD zone"! You know the one! Nothing, nada, zilch, zero!) Yeah, I started working on this weeks ago and all I had was the Chalk Talk tag punched out--that's it!  It just wasn't working!  I wandered around Pinterest and I saw a few ideas that caught my eye and then two days before I had to leave it all came together! (Sadly, that is my MO, hurry up and wait till the last minute! I finished my cards in the truck on the way to SLC!)  Luckily for me I only had to do 11 of them!  I used Soho Subway DSP and Hello, Lovely stamp set along with a little bit of Gorgeous Grunge on the Alphabet Press embossed background.
Besides the tag, the accessories I used were: Scallop edge punch; 1 1/4" circle punch; and a bit of 7/8" Cotton Ribbon which is easy to stamp on!
I don't know if you see a pattern here, but I REALLY like Summer Starfruit and Pool Party!!
Tomorrow I will post some of the swap cards I received! Stay tuned!

Julie

Tuesday, July 16, 2013

Ready, Set....GO!!

I'm just finishing all my last minute stuff before I leave for convention!  Yay!  I thought I would post this card I made at my friend Jeanna's a few weeks ago.  It uses Hello, Lovely stamp set, the 1 inch square punch, clear embossing powder and the Decorative Label punch.  I took some Basic Gray 1/4 inch stitched grosgrain ribbon and I pulled the center stitching to gather the ribbon (make sure you glue or knot the end) and wrapped it around the card.  Lastly, I added a Vintage Faceted designer button for some "pretty"!  The hardest part about this card is that you probably need to use the Stamp-a-ma-jig to line up the embossed images after you attach your squares.  It's more time consuming, but it still only took me about 20 minutes to make.

Make sure you follow me on Facebook, Twitter and Instagram this week (links on the right)--I'll be posting fun photos and excitement from Stampin' Up! Convention in Salt Lake City!
Today is also Download Tuesday for MDS, so make sure you check out the fun new downloads this week!

Julie

Friday, July 12, 2013

One More Week...

...Until Stampin' Up! Convention!!  I'm so excited!  In the almost 17 years I've been a demonstrator, I've attended 16 conventions!  I only missed the Denver convention because I had just had surgery (and truth be told, I still planned to go, but my husband told me to rest!)  Anyway, I so enjoy being around all the demonstrators every year--their excitement, their talent, their friendships, it is all completely breathtaking!  New friendships are made; happy tears are shed; craziness ensues; ideas are shared; knowledge is gained; more craziness ensues; {PRIZE PATROL}; lots of laughter; photos, photos and more photos; even more craziness ensues; {PRIZE PATROL}; sleep-deprived silliness; lots of swapping; screaming, jumping up and down craziness ensues; {PRIZE PATROL}!!!  There, doesn't that sound like fun?  I am so excited that it's hard for me to even concentrate on anything else for very long--I think it's called "convention brain".  My family is pretty much used to it by now, but being compounded with my recent "brain fog", I'm sure it's driving them crazy!  Maybe I'll be back to normal in a few weeks...maybe not!!!
I have a few projects to post before I leave, so hopefully my "convention brain" will let me focus for a bit on blogging!  Here is my submission for MDS Monday 21:
I had taken some panorama photos on a drive up through the Red Rock Loop and I thought that they would be perfect for this technique.  If you would like to see how this is done, you can check out my photo grouping video here.  This image of the storm is so stunning that I didn't want to add too much, just a few elements with colors practically taken from the landscape.  I browsed through the MDS color combo tool and found one that was perfect for this page and with the recolor tool I could change all of my elements to coordinate with that color combination.  Here's my color swatch for this page:
Almost all of the elements on this page are from the Be Yourself May kit and were recolored.
I've got to hurry and get my swap cards finished and some shopping done before I leave, but check back, I'll have a few more projects for you before I leave!  

Julie

Saturday, June 8, 2013

Feeling Blue

Well, I'm not really feeling blue, but I am feeling in the mood for blue. Light blue, dark blue, blue-green, greenish-blue, any blue!  I saw a similar color combo on Pinterest and I just had to change it to Stampin' Up! colors!

 I'm not sure if it reminds me of the beach at dusk or a mountain lake in the morning, but it calms me.  Do you have colors that do that for you?  So, anyway, I decided to make a couple cards with this color scheme and I used some new techniques that add a little bit extra to a kind of plain card.  The first one uses a technique I saw on Stampin' Up!'s website.  You can see it here. Angie, a concept artist at Stampin' Up! used the new firm foam stamp pads and dragged them across the paper which gave it a sort of watercolor look to it.  Now, I have some of the new firm foam pads, but not all, and it definitely makes a difference!  Can you tell which ones were the old linen pads? Yep, Night of Navy and Soft Sky!  That's ok, it still came out pretty well.  The new pads have a smoother feel to them so they seem to smear better.
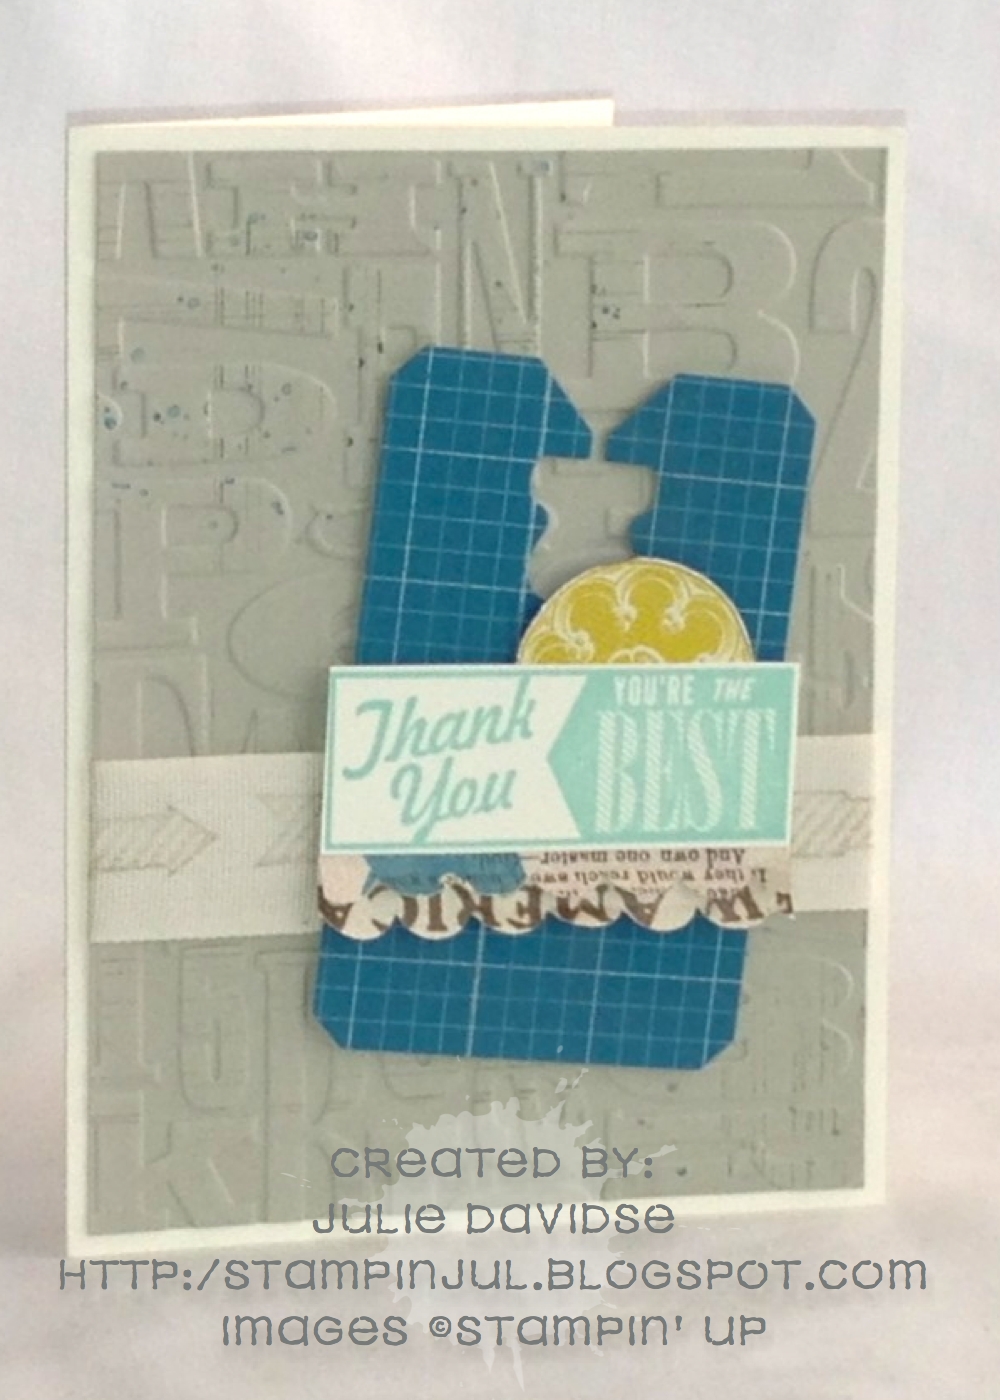
I used the new Chalk Talk stamp set in Basic Gray and colored the Whisper White taffeta ribbon with a Pool Party marker--easy way if you don't have all the ribbon colors you want!!!  I really like the graphic look to this card, what a great technique.
The second card used the same stamp set, along with the Chalk Talk framelits set that comes in the Chalk Talk bundle (you save 15% if you buy them together).  It's a smaller card (3 1/2 x 5) so the small tag takes up most of the front, then I just added little pennants at the end (got that idea from this card by Shannon Jaramillo).  On the tag, I used a technique I learned at Salt Lake Regional convention in April and was demonstrated by Jane Lee (very talented Stampin' Up! Artisan team member/new stampin' friend).  Jane used the stamp pad and wiped it across the embossed cardstock so that the raised part got inked and the debossed part didn't (makes perfect sense, right??) I ran my die cut Pool Party tag through the Big Shot with the chevron embossing folder and then inked it with Night of Navy.  Again, I think it would've turned out better had I used the new ink pad, but it did the job.  I finished it off with some Whisper White taffeta ribbon and the white heat embossed stamp (from Chalk Talk) on the top and inked the edges of the card with Night of Navy.
If you follow me on Instagram (you do follow me, right?) you saw the photo of my car thermometer--now, you know that the official temp (109º) is taken in the shade at the airport, so the car was reading the ambient temperature with me standing in the sun on the blacktop,  and it was scorching hot!!!
I had to sit and wait for my steering wheel to cool down before I could actually drive!  I hope it's not nearly this hot where you are, but if so, please stay cool and hydrated!  School's out, summer is here and I'm going to start counting down the days until Convention!!  Yay!

Julie

Saturday, March 16, 2013

One more week of Sale-a-bration

If you haven't guessed already, I kind of LOVE the Sycamore Street DSP from Sale-a-bration!  Although I'll be sad that I can't use in in demonstrations, I still get to use it in My Digital Studio!  It came on a disk that you can get for FREE when you have a qualifying order, so contact me or go to my website to see all the fun stuff you can get for free, but just for one more week--no pressure!  Don't forget to try the MDS2 30-day free trial while you're there!  So, since it's completely gorgeous here in Southern Nevada, I thought I'd make a fun, bright, cheery card, and what's more fun, bright, and cheery than a pinwheel?  This is made using the Pinwheel die for the Big Shot and all you have to do is put it together, easy peasy, right? Well, only if you have really great vision!!!  Ok, so it took me a bit of time to put the tiny brad though the tiny holes, but I love the final product.  I'm really thinking I need to make a larger one for decoration, so stay tuned!

I also have a fun My Digital Studio card that I created a while ago, but I decided to change up the colors I had originally done the card in and print it through Stampin' Up!'s great printing service.  These colors just say "Spring" to me, don't you think?  I picked them using the color combo selector in My Digital Studio, so I didn't even have to think that hard (I just added the Pale Plum)!


Hope the weather is looking brighter where you are!

Julie

Thursday, February 28, 2013

Colors of Spring Blog Hop

Ok, so it's still my birthday month and my actual birthday today as I am writing this, so I finished off the month with one last birthday card.  I used My Digital Studio's color combo selector to find a spring palette and this is what it came up with:

I have to smile when I see this card, only because it speaks truth!  I think only one candle will suffice from know on--we don't need to get the fire extinguisher out in order to put out the flames!

I used Tempting Turquoise, Lucky Limeade, Daffodil Delight, and Whisper White cardstock; Lucky Limeade ruffled ribbon; Sycamore Street DSP; Tempting Turquoise classic ink pad, Daffodil Delight and Lucky Limeade markers; Dazzling Details glitter; clear embossing powder; Oval Framelits; Color spritzer.  Our new classic ink pads are so juicy that you can literally pour embossing powder on the dye ink and heat it. You will get the same look as if you used pigment inks.

I have to thank all of you who have sent, texted, emailed and called with your birthday wishes, they were all wonderful!  I've had a wonderful birthday!

Make sure to visit all the other blog hoppers, and please leave comments so we know that you enjoy it!


Jill Wakefield (previous blog)
Julie Davidse (you're here)
Michelle Stoll (next blog)

Have fun hopping!

Julie

Saturday, February 23, 2013

Birthday Card, take 4

We're counting down to the end of February...well at least I am, because that is my birthday!  And no, I was not close to being a leap year baby, the year I was born wasn't even a leap year.  I seem to get that question a lot!  So today I'm posting a fun card made with the darling Sycamore Street Designer Series Paper that you can get for FREE with a qualifying Sale-a-Bration order ($50).  I LOVE these colors together!  They are so YUMMY!  I used the new Best of Birthday 25th Anniversary set that will be available until March 2014, so there's plenty of time, but you might want to get each of the "Best Of" stamp sets that will be rolled out each month, so keep your eyes open for all the cuteness.  I used the Big Shot to emboss the Perfect Polka Dots and the Peekaboo Frames Bigz L die for the frame (I cut off the little "door" that is on the front of the frame).  To top it off, used my blender pen to add a bit of color to the stamp and tied a ribbon with Crumb Cake seam binding.  You can find all of these items on my website.


It's pretty windy here in Vegas today. But the high is going to be in the 60's! YAY!
Hope your day is happy!

Julie

Thursday, February 21, 2013

Good Times, Good Friends

Here's my entry for this weeks MDS Monday challenge and Mydgitalstudio.net challenge.
MDSM 7 sketch


This weeks MDSM sketch is pretty basic, but I made just a few changes.  Digital scrapbooking is still a struggle for me, but it's better when I have a sketch to work from.  The Mydigitalstudio.net challenge is "free fonts" and I used two free fonts on this page.  The first one is Simply Glamorous and the second one is CK Jot.  I also used Natural Composition overlay (one of my favorites), stitching from Downtown Grunge, brads, Urban Oasis DSP, Urban Garden DSP, satin ribbon, flag from A Split Second.  I used the My Digital Studio color combo selector and because Livvi was wearing her Real Red dress, I clicked on Real Red and this combo was one of the options. 

This was my son's very first dance.  They had a great time at the dance and went and played glow in the dark dodge ball after the dance (each couple had matching "glow" shirts).  Too bad they didn't have any photos of that, they said they had a blast!!

Julie